Making changes to the User Guide
Overview
The NEMO User guide is a collection of html web-pages that are constructed via the python
sphinx package from ReStructured Text (rst) files using the Read The Docs theme.
This part of the guide is for developers who wish to edit or add to the guide and for
maintainers who wish to make those changes live.
These pages will:
Explain where the source material is located within the GitLab repository
Describe how developers can clone the material, edit and build locally.
Explain how live html versions can be updated by maintainers (officers)
These pages will not discuss the ReStructured Text syntaxes or directives themselves.
There are plenty of on-line resources to help with this and the NEMO user-guide rst
files themselves already contains examples of most of the constructs you are likely to
need. Simply find a close match to the type of layout you are after, cut-and-paste the
section and change the content.
Location of the source material
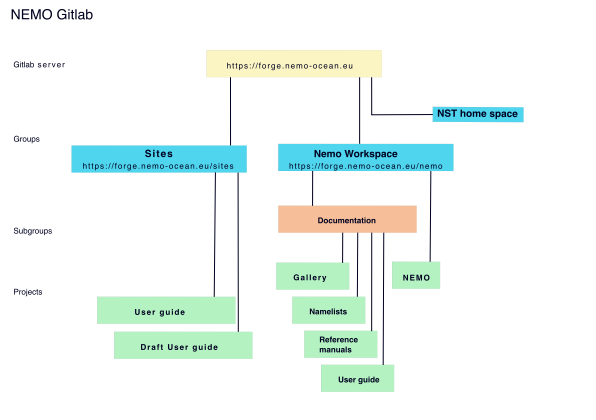
The source material for the user guide appears to be located in multiple locations in the
NEMO GitLab repository. Two User guide projects are shown in the systematic above. One
as a project in the Documentation subgroup of the NEMO Workspace group and one as
a project in the Sites group. There is also a Draft User guide project under
Sites, but more about that later. The apparent duplication is intentional and serves
to separate the files that any developer can edit from the copies on the publically
accessible Web server.
The public pages are deployed to a static website by a GitLab Pages server that runs on
projects in the Sites group. For security, only maintainers (i.e. NEMO officers) can
create and edit projects in the Sites group. However, the projects under Sites
only include the source material as a submodule reference to the NEMO Workspace >
Documentation > User guide project. All developers are able to create issues and merge
requests and commit to branches of NEMO Workspace > Documentation > User guide.
Hence, all developers are able to contribute to the user guide. Maintainers can review
and accept merge requests like any other development. Any merged material will only become
live html once an officer has updated the submodule reference in the appropriate Sites
project.
This may appear confusing but is relatively simple in practise. The next few sections illustrate the steps needed to create an issue, merge request and branch, make a change, review the change locally, push changes back, have the changes merged and ultimately have the html versions created and deployed. The example used for illustration is the creation of this very section of the user guide.
Preparing to edit the guide
Preparation follows the same procedure as any development. I.e. create an issue and
linked merge request in the GUI for the NEMO Workspace > Documentation > User guide
project at User guide
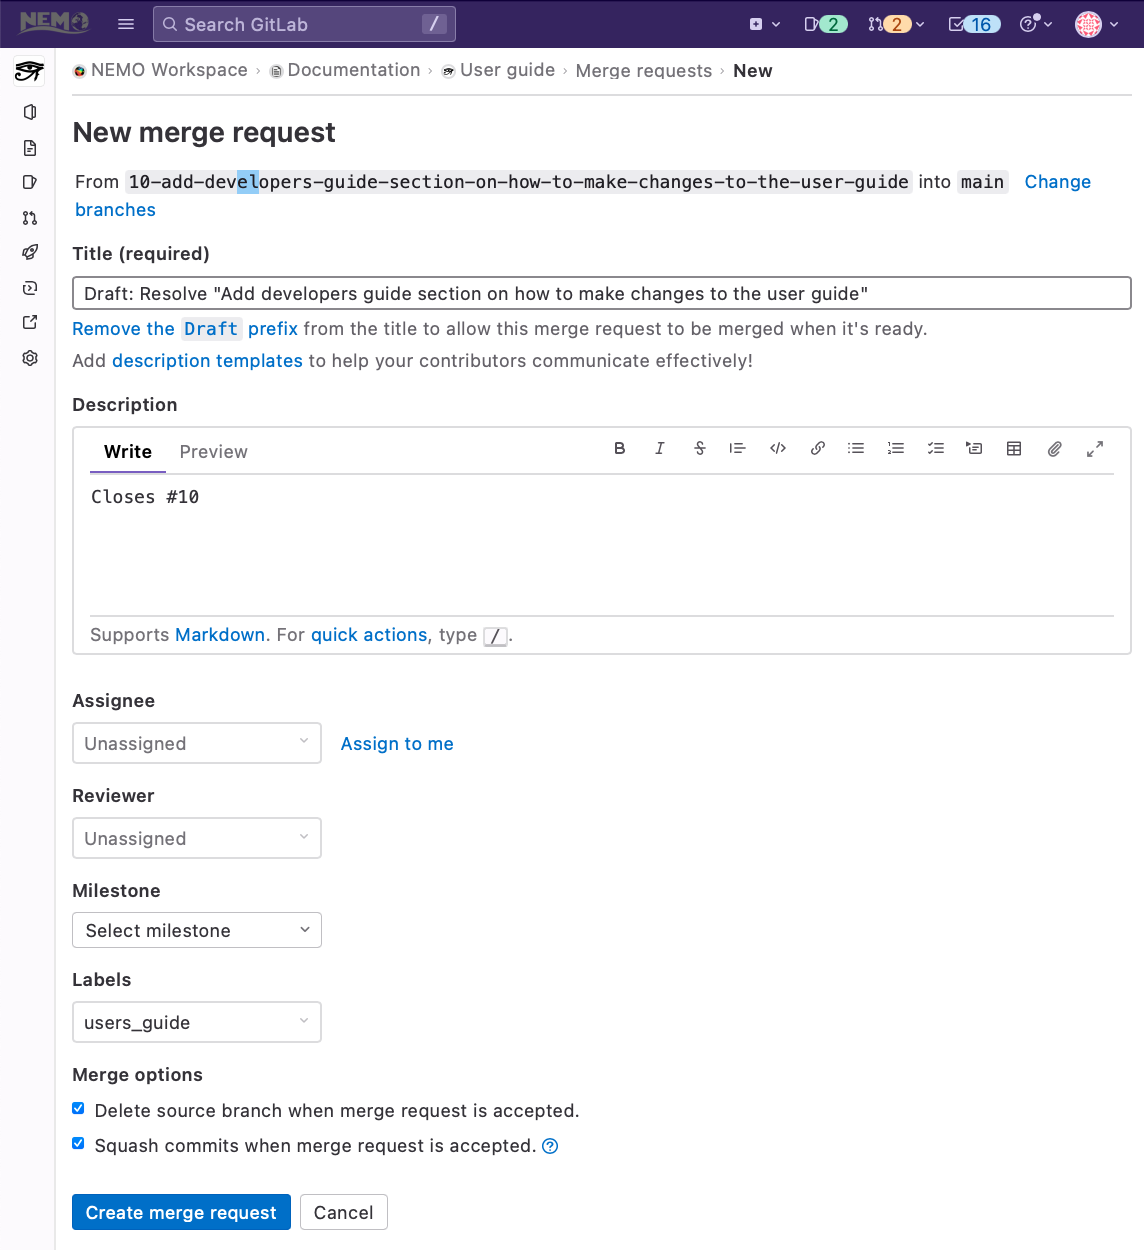
The following images illustrate the process for the changes that created this section of the guide:
Create a new issue (use the
users_guidelabel)
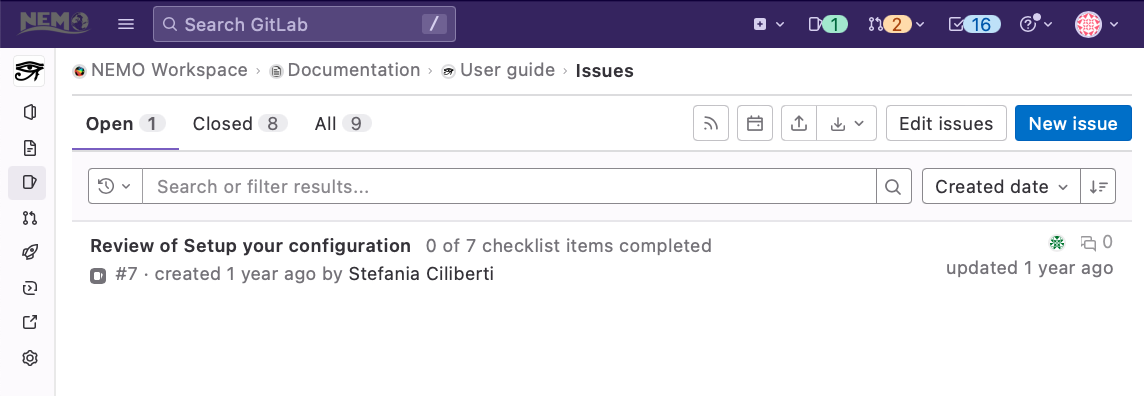
Include a brief description
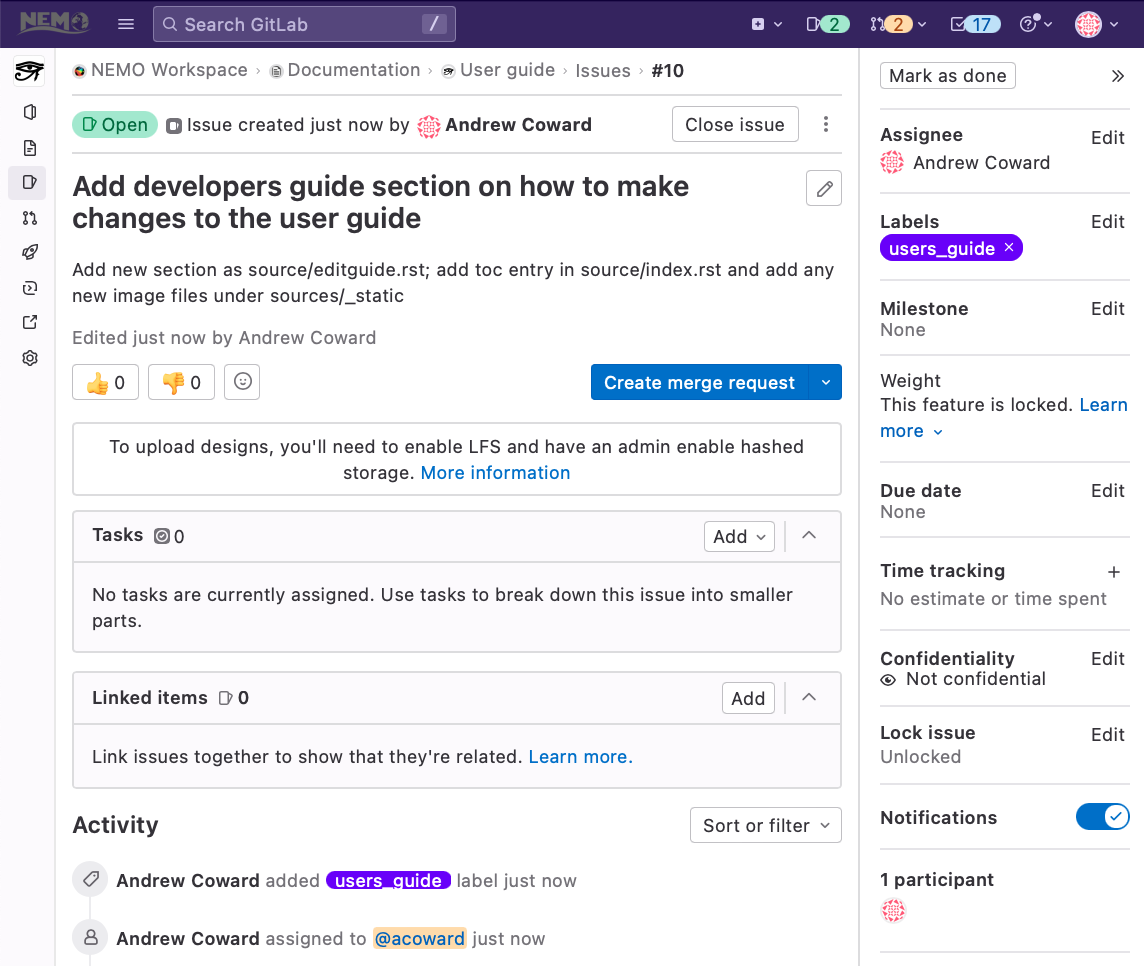
Create a linked merge request and branch
Cloning and editing the guide
With the merge request and new branch in place, the project can be cloned to your local machine for editing:
git clone --recurse-submodules git@forge.nemo-ocean.eu:nemo/doc/guide.git
cd guide
git branch -a
git switch 10-add-developers-guide-section-on-how-to-make-changes-to-the-user-guide
Note the namelists and gallery subdirectories are submodules. The contents of these are unlikely to change often (at least any parts actually used in the user-guide) but, if you need to update the references then descend into the appropriate directory and issue the update command; e.g.:
cd namelists
git submodule update --init --force --remote
git add namelists
Otherwise, just edit or add to the source directory content as required. For example:
vi source/index.rst
vi source/editguide.rst
cp ~/Pictures/guide_*.png source/_static/
cp ~/Pictures/repo_layout.png source/_static/
git add source/_static/guide_*.png source/_static/repo_layout.png
git add source/index.rst source/editguide.rst
The ability to preview your changes (and hence check for build-time errors) is an essential requirement of the development process. The next section explains how to set up and use a suitable environment.
Building and previewing
To build and preview locally will require:
A python environment with
sphinxand a fewsphinx extensionsA browser with access to the local filesystem
Both requirements are easily satisfied on most Unix-based operating systems.
The Sphinx installation page lists many ways of installing sphinx.
Perhaps the easiest being via Anaconda or Miniconda:
conda install sphinx
The required extensions are not always available from the default conda server but can be easily obtained from alternatives or installed using pip:
conda install sphinx_rtd_theme
conda install -c conda-forge sphinxcontrib-bibtex
python3 -m pip install sphinxext-remoteliteralinclude
As an example, these commands on a Macbook resulted in the following sphinx install:
conda list | grep sphinx
sphinx                        5.0.2            py37hecd8cb5_0
sphinx_rtd_theme              0.4.3              pyhd3eb1b0_0
sphinxcontrib-applehelp       1.0.2              pyhd3eb1b0_0
sphinxcontrib-bibtex          2.5.0              pyhd8ed1ab_0    conda-forge
sphinxcontrib-devhelp         1.0.2              pyhd3eb1b0_0
sphinxcontrib-htmlhelp        2.0.0              pyhd3eb1b0_0
sphinxcontrib-jsmath          1.0.1              pyhd3eb1b0_0
sphinxcontrib-qthelp          1.0.3              pyhd3eb1b0_0
sphinxcontrib-serializinghtml 1.1.5              pyhd3eb1b0_0
sphinxext-remoteliteralinclude 0.4.0             pypi_0          pypi
With a similar and correctly configured sphinx installation, building the html files from the rst files is as simple as:
make html
from the top guide directory. A successful build should look something like:
make html
sphinx-build   -b html          -d build/doctrees   source build/html
Running Sphinx v5.0.2
loading pickled environment... checking bibtex cache... up to date
done
building [mo]: targets for 0 po files that are out of date
building [html]: targets for 0 source files that are out of date
updating environment: [config changed ('extlinks')] 18 added, 1 changed, 0 removed
reading sources... [100%] zooms
looking for now-outdated files... none found
pickling environment... done
checking consistency... done
preparing documents... done
writing output... [100%] zooms
generating indices... genindex done
writing additional pages... search done
copying images... [100%] _static/agrif_sponge.png
copying static files... done
copying extra files... done
dumping search index in English (code: en)... done
dumping object inventory... done
build succeeded.

The HTML pages are in build/html.

Build finished. The HTML pages are in build/html.
The results can be previewed by opening the build/html/index.html file in
your local browser. In my case this is:
file:///Users/acc/guide/build/html/index.html
Note
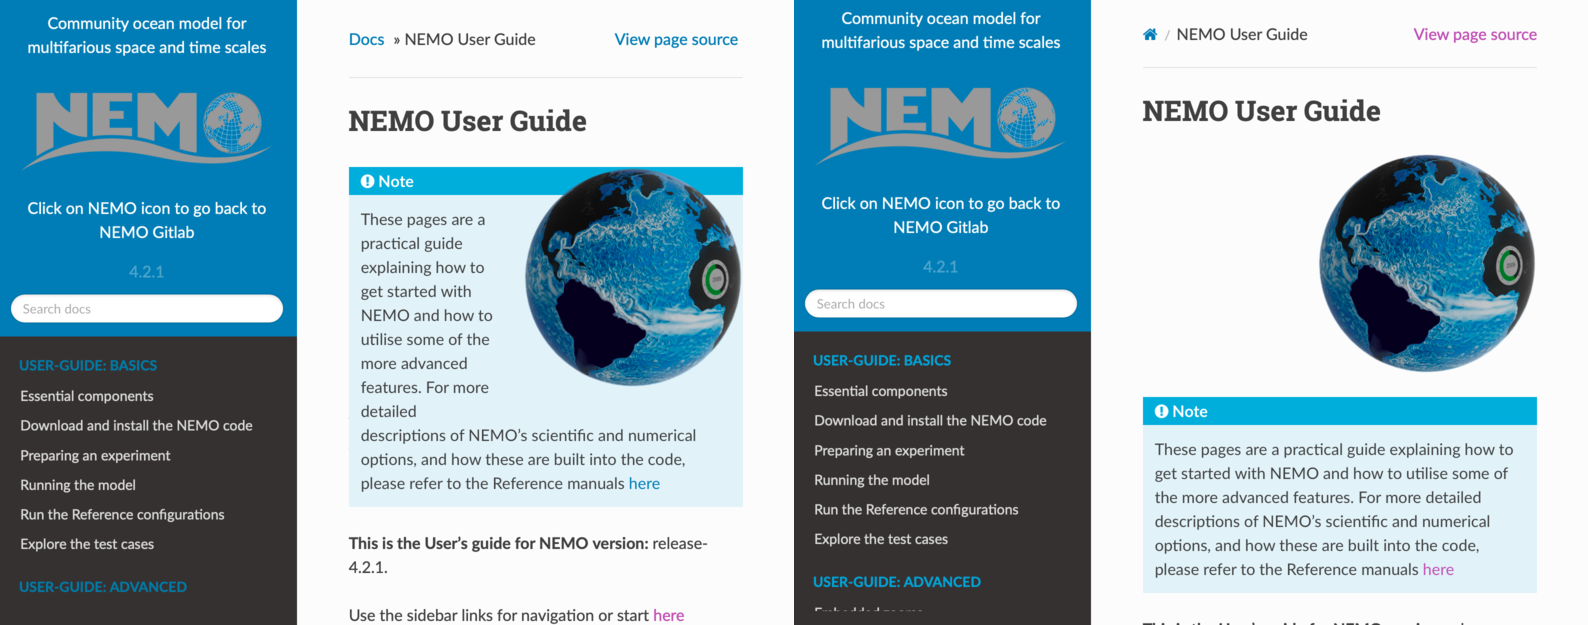
The rendered page may look slightly different to the exact same version eventually built on the NEMO GitLab server. Compare, for example the two images of the landing page below. The html files are identical but the left-hand image is read from the local disk; the right-hand image is as the live user guide is displayed - in the same browser! Given this, local previewing should be used to check content and functionality without too much effort on fine tuning of precise layout.
Send for review and merging
After completing your edits and successfully previewing, push back the changes:
git add source/_static/guide_*.png source/_static/repo_layout.png
git add source/_static/landing_views.png
git add source/index.rst source/editguide.rst
git commit -m'Added section on how to edit the user-guide. Successfully built and previewed locally'
git push origin
In the GUI, go to the merge request page and mark as ready. Contact the reviewer and have the
changes approved and merged. Your role as developer is now complete (pending future updates).
Publishing a new draft user guide
Once the new material has been merged, a maintainer can chose to update the live pages
by updating the submodule link in one of the Sites projects. In most cases this
will be the Draft User guide project since the User guide project should only
change when a new code is released. The act of pushing the change back to the GitLab
server will trigger a pipeline that builds and deploys the html files:
git clone git@forge.nemo-ocean.eu:sites/draft-guide
cd draft-guide
git submodule update --init --force --remote
git add guide
git commit -m "update of submodule link"
git push origin
Once both stages (test and deploy) of the pipeline have successfully completed, the new html pages will be available at https://sites.nemo-ocean.io/draft-guide/
Publishing a new user guide
The same procedure is required when updating the release version of the user guide, with
the additional recommendation that the commit message mentions which release this commit
is designed for (and make sure this matches versions as set in source/conf.py):
Updating of the user guide is expected to occur much less often than updating of the draft user guide.
git clone git@forge.nemo-ocean.eu:sites/user-guide
cd user-guide
git submodule update --init --force --remote
git add guide
git commit -m "update of submodule link for release X.X.X"
git push origin
Once both stages (test and deploy) of the pipeline have successfully completed, the new html pages will be available at https://sites.nemo-ocean.io/user-guide/